
Pole Bending Horsemanship Principles for Success at Pole Bending and Barrel Racing
by Ken SmithWe believe that good horsemanship is the foundation for success at pole bending and barrel racing. A successful pole bending horse and rider are not exceptions to the rules, they are the proof of the rules. We believe in the team - the horse and the rider working as one. In order to excel, both the horse and the rider must master the principles.
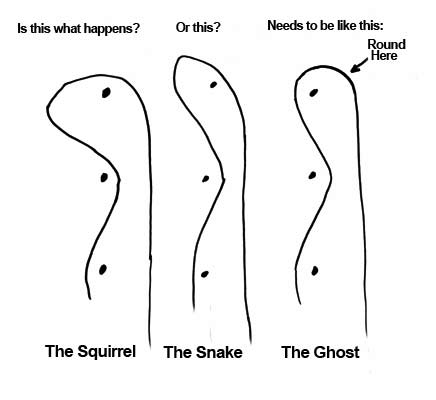
Technique: We advocate using a zig-zag pattern. It is a slalom. Think ‘skiing’. We like this approach because it encourages the horse to move through the pattern following its nose with its shoulders and hips out away from the poles. The other common approach is the lateral or side-pass. Few horses can reach their potential moving laterally through the pattern because this method encourages the horse to run with its shoulders and hips in, with a falling kind of action. A side-pass also uses up a lot more of the 21 feet of space. This method results in a lot of poles being tipped by either the rider's knee or the horse's hip. So ... let's stick with the zig-zag slalom.
The following video is a brief introduction to our approach to pole bending. It is taken from the Pole Bending Technique Video that we offer for sale.
To view this introduction, start the media player below. Watch, as we begin to walk and trot, then lope, then gallop, then run!
Following is a list of topics included here. You can click on a topic and jump directly to it, or you can simply scroll down through the entire list.
Application of the TechniqueCauses of Downed Poles
The 'Look'
The Start of the Run
Avoid the 'Santa Claus' Run Down
The First Turn
The Three-Pivot Turn
The Outside Rein
The Hindquarters for Turns
A Straight Horse and Shoulder Control
The Video Camera as a Training Aid
Application of the Technique
The rider's mental image is a zig-zag, and you can clearly see that pattern in the overhead view in the video clip above, but from gound level, an observer might perceive the pattern as a smooth weave. Ride from key spot to key spot. The key spot is where the rider's knee is past the pole. The widest part of the pattern is at the key spot. After the horse crosses the pole line, until you reach the key spot, you are moving away from the pole line. Wherever you are in the pattern, your mission is to get to the next key spot. You want to try to cross the pole line at the midpoint – This is critically important. Horses have a tendency to anticipate – they will want to start back across the line early, and they will want to cross the pole line before the midpoint. Use your aids to make them wait for the key spot, then aim them (don't push them!) straight from that key spot, across the midpoint, to the next key spot, head-first. I like to think that at the key spot I aim for the next one by positioning my horse so he can go straight across the midpoint to the next key spot. To accomplish that, I want to ask him to move his hips out just a little, so that part of the direction change happens with his hindquarters - he is in essence fading away from the pole.
Causes of Downed Poles
1) Lack of respect for the poles.
This is so important that after conducting numerous clinics across the country, I have concluded that this is by far the number one cause of downed poles.
In my opinion, most riders treat the poles way too casually. By that I mean that when practicing, they act as if a downed pole is just no big deal.
They seem to think that the only time they need to concern themselves with downed poles is during a competition. But then it is too late!
Let me explain. Pole bending is arguably the most challenging and complex speed event. It is precision dressage at speed. It is a dance with your horse. Things happen rapidly in this event. Barrel racing is slow motion compared to pole bending. Although we strive to be perfect, you as a rider will not be in perfect position at all times. You need your horse to be on your team. You need your horse to fill in when you make a mistake. That means that your horse must have a respect for the poles. I like to think that there are 20,000 volts of electricity in each pole, and if I touch it, or my horse touches it, we both fry! You must ask yourself if you have taught your horse to respect the poles, or has your horse learned from you that they don't really matter? Horses are always learning. Here's how it works: First downed pole - mistake. Second downed pole - problem. Third downed pole - habit!
2) Insufficient direction change.
Occasionally you will find a horse that stiffens his body to the extent that he resists being guided through the direction changes in the bending segment.
This often results in the horse running too straight and too close to the pole line, and the rider's knee takes down the pole.
The horse needs to be ridden to each key spot. He needs to be reminded that he must flex his body (not just his head and neck) left and right.
A horse on an arc should have his spine curved to match the arc. Few horses do this perfectly. They are either right-handed or left-handed, just as we are. Most are okay to the right, but are stiff in their rib section to the left (but a few are just the opposite!).
They need to be suppled. In order for them to flex to the shape of the circle, they must move their ribs off the rider's inside leg.
What we ask them to do is to shape around that inside leg. We encourage this flexion by shaping our own body either left or right, looking where we are going with our body, as if we had eyes in the front of our shoulders.
3) Improper patterning.
Horses can only learn to run poles at speed by running at speed, BUT ... they learn where to put their feet by doing slow work at the walk and trot. DO THE SLOW WORK!
And do it correctly. Remember, a running horse will need more room when passing a pole because they will be leaning, so allow more room in your slow work.
It would be about right for you to trot the pattern with about 3 or 4 feet between your knee and the poles. Make sure the horse's shoulder is slightly out (not in),
ride to the key spot, cross at the mid-point, and ask for the hip to move out just a little.
4) Improper Flexion.
Think "Shoulder Out!" A horse needs to be flexed in the direction he is traveling. For pole bending, the direction changes are so slight that in a full speed run they will be almost straight. You can live with that. What won't work is inverted flexion. That is where the horse's body is flexed backwards to the arc on which they are traveling.

In the illustration above left, the horse is inverted. This situation can be caused by the rider using a direct outside rein to attempt to hold the horse off the pole. That doesn't work, because it results in the horse thrusting a shoulder into the turn, disturbing the horse's balance and position (and by the way, it doesn't work for barrels either). The correction is to use the inside aids - inside leg and inside rein - to hold the horse as required.
Another cause of inverted flexion is a horse that is not supple. He is stiff on one side and will only flex in one direction. In a run, a horse like this feels like he is running properly past a pole on one side, but on the opposite side he feels like he is falling back across the pole line. For more on this subject, refer to the topic, A Straight Horse.
5) Lack of Control.
You have to make your key spots. The horse will develop a two-strided rythm which will ideally carry him between the key spots, but the key spots must be the rider's focus, and must overrule the rythm if the two principles get out of sync. You must be able to position your horse at each key spot!
Here is an exercise (done at slower gaits - trot, lope) that helps with control. We want to be able to "lateral march" the horse diagonally out of the pattern whenever we want. By that we mean, you shape the horse for a pole passing stride (say we're passing a pole on our right). We want to be able to maintain that right shape and move the horse out of the pattern on a diagonal line forward and to the left. We want to be able to do this at any pole, without disrupting the horse's or the rider's position. It is very similar to the position for the horse and rider that you would use to do a "head-out" dressage move down the fence. It is accomplished using inside aids - inside leg and inside rein. When done correctly, there should be no change in the shape of the horse or rider, and no discernable movement of the hands. Why would we want to be able to do this? We don't want the horse diving in early at the pole. We want to be able to hold the horse if he has not yet made it all the way to the key spot beside the pole. This exercise, used occasionally, helps keep the horse honest, and helps the rider develop a finesse with the reins.
6) Improper turn execution.
The turn sets up the bending segment. The horse must finish the turn at the key spot right along side the turning pole, with his body directed at the next pole. The horse must make it past the next pole in three (3) strides - a starting power stride as he departs, then a longer one, then a full stride. That must take him all the way to the next key spot - the spot where the rider's knee is past the pole, and with the horse's off-lead leg landing past the pole. If the rider over-turns the pole, which is very common, then the horse will not make it to that all important next key spot.
Another common problem, especially at the first turn, is that the rider is not ready. The horse is ready, but the rider is not. The horse senses this lack of leadership on behalf of his human, and hesitates slightly, waiting for the rider to catch up. The result is a shortened stride, and once again, the horse does not reach the key spot.
Of course another problem is for the rider to miss the set for the turn and then run past the end pole, turning behind it or wide, again resulting in a messed up stride pattern and a missed key spot at the next pole.
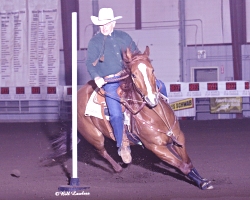
The 'Look'
This look is not working. Good-bye, barrel!
In the photo on the right, you will see an example of a 'Look' that is not working. The look is completely disconnected from the horse. The rider appears to be focused on the barrel as if merely doing so will somehow cause the horse to go there.
Here's the principle: The look is not an eye and head thing, it is a body thing. You look with your entire body. You look as if your eyes were in your shoulders. When you shape your body in this manner, a number of things occur: Your shoulders are rotated in the direction of the turn. Your hands follow your shoulders and are in the most effective position to control the horse. Your weight is shifted on your seat bones and they move in the saddle in a way the the horse can feel. And notice your legs - your inside leg becomes active at the cinch, asking for flexion, and your outside leg is in a great position to apply holding control to the hindquarters. A diagonal is opened toward the inside of the turn for energy to flow, and that is exactly where you want it.
We teach our young horses to follow the look, and apply it consistently. Try it with your horse. It may surprise you how fast they will pick it up.
The Start of the Run
Where does the pole bending run actually start? Some riders seem to think it starts at the far end of the pole line. You will see them ride to a position past the end pole, turn, and then pause, as if catching their breath or getting mentally prepared for the ordeal ahead. Then they enter what they think of as the course. Let's think of it a different way.
The pole bending run starts at the starting line! When you cross the line, you are in the course. Plan your start so that you cross the starting line at full speed. After that, any pauses are wasted time.
Pick a spot to cross the starting line, and ride straight to the key spot where the first turn will begin. Ride the turn, and as you leave, you must simultaneously transition to the slalom. There is no pause.
Avoid the 'Santa Claus' Run Down
And what is the Santa Claus run down? You can recognize it by its characteristic, "Ho!, Ho!, Ho!", often accompanied by three 'yank, yank, yank' pulls on the horse's mouth. Each whoa spills energy and speed, and wastes time. How much time? Well, video analysis reveals that it is easy to waste more than a half second with a conservative run down and run home.
The horse should be taught to cue off your body position. Ride to a spot at or near the fifth pole, and sit down. Ask the horse to shape by shaping your own body in the direction of the turn. If you feel you need one, then use one 'whoa' here. Any pull on the horse's mouth that causes him to react by altering his head position is too much. Monitor this with your videos. You don't want to spill any energy, you want to use it all and drive him into and around and then out of the turn. Energy you can carry with you into the turn will be there to help you leave.
The first turn
The key to the first pole is turn preparation, and yes, that includes rate, but there is more to it.
Here are a couple of my ideas in this area:
1) Rate: The horse must have a stop. If the horse isn't capable of burying its tail in the ground and stopping on its hindquarters, then that needs to be developed.
Then the horse needs to learn that when the rider goes from a forward 2-point position to a deep sitting position, that is the cue for rate. They can learn that at the trot and lope.
2) Preparation: The horse must be shaped into a left flexion for a left turn, BEFORE the horse arrives at the turn. Failure to get the shape is inviting a failed turn.
So the competition turn happens like this:
a) Ride hard in a forward position to a spot somewhere between poles 4 and 5, then sit deep in position-left (for a left turn). That is left shoulder slightly back, left hip slightly back,
inside leg on the horse at the cinch, asking for the ribs and shoulder to move out, and the nose to move in, the inside rein holds the flexion you get with the inside leg.
b) The horse continues forward in a rating slide, in that flexion, until it arrives at the turning spot, which can be anywhere form 6 - 15 feet to the side of the turning pole, and 6 feet or so past it.
You determine the turning spot by reverse-engineering the turn: Figure you want to end up and the end of the turn right along side the turning pole, so back up to figure out where you need to enter the turn to effect that.
c) If you set up the turn, the turn will happen. And with slow work at a trot, our little mare learned that when she was ridden to the turning spot and put in flexion, we were always going to expect a turn.
I would expect a poor turn if I saw a rider ride all the way to the turning point in a forward position without sitting down.
I would expect a poor turn if I saw a rider ride all the way to the turning point without asking the horse for flexion until the last instant.
I would expect a poor turn if I saw a rider check the horse for the turn and the horse threw its nose in the air to avoid the bit.
The three-pivot turn
Let's not have any 180's. Sometimes a rider falls into the trap of thinking of the end turns in a manner like, "now go the other way". The horse is asked for a 180 degree direction change all at one time with a hard inside rein. It may feel fast, and with all the commotion and dust flying, it may even look fast, but it is not.
There are three (3) pivots in a fast, smooth turn. That involves putting the horse on the ideal track and driving him forward and through, using the inside leg to ask for flexion in the horse's body to match the turn. The inside rein merely maintains the flexion that you ask for with your inside leg. The horse pivots once at the key spot about 3 feet past the end pole, then crosses behind it to the second pivot point, then hits the key spot on the other side of the pole, and then drives out.
The Three-pivot Turn
Look at the photo on the right. Some people would call this a 'run around' turn, but horses can only turn by pivoting. The horse's front feet are on the second pivot spot, and the hind feet are leaving from the first pivot spot. The flexion in the horse shows she is ready to continue the turn, and will be reaching for the third pivot spot. You can pretty much see where those spots should be on the ground. You can also see clearly that the horse is crossing over the back side of the pole, and there will be no sharp angles in the turn - all three pivots will be very close to the same degree of direction change.
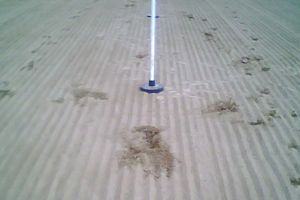
Footprints of a Three-pivot Turn
On the left are the footprints of a three-pivot turn. This was the turn near the starting line, and it was a right-hand turn. You can see that the hind feet have landed in the same tracks as the front feet. I happened to notice this pattern just after making a fast practice run on new ground with Perky, Pat's great barrel and pole mare. I reached for my cell phone and took this photo. Look at how closely it matches the above photo of Nicky making that same turn. What a great proof of concept!
Think about it. A one pivot turn or a two pivot turn requires the horse to stop and fling his hindquarters around his forehand. That disengages his 'motor', since a horse drives from behind. And then there goes all of your forward motion, spilled out on the ground where it doesn't do you any good.
This three pivot information also applies to barrels, by the way. Some horses might require a fourth pivot on a barrel, especially at the first one, since it is the tightest turn, but they still must move from pivot to pivot.
What you absolutely don't want is a corner. By that we mean any pivot that is noticibly sharper than a 90 degree angle, forming a point . Again, watch those videos. Strive for even pivots.
There is a place for the outside rein.
It is a common barrel racing technique to drop the outside rein entirely as you reach for the horn with your outside hand. The intent is to 'lead' the horse around the turn with the inside rein. The horse has been trained to follow that leading. So long as the horse cooperates and the rider properly executes this move, this technique can be very successful.
The challenge comes with the heat of the battle. In the race, the adrenaline flows freely, and the excited rider pulls that inside rein to force the turn. Here's the point: The primary effect of a direct inside rein is to move the hindquarters out. It does not matter how the horse is trained, that is what that direct rein does! The hindquarters then travel in a larger circle than the front, and the result is a partial disengagement of the hindquarters and a loss of energy in the turn. What you see on your television (record the barrel races and and play them back in slow motion) is that the horse often will disunite by falling out of lead behind. He has been forced to do so, in order to retain his balance. It is not uncommon to see a horse run almost all the way to the third barrel disunited.
The moral: Don't pull the inside rein! No respectable barrel clinician is teaching that. We acknowledge that there are many different ways of getting the job done, and many people have been successful with the technique of leading with the inside rein. But if you feel you have to pull on it to get the horse to turn, then it is not working for you.
If your horse feels like he is falling out through his outside shoulder, then he needs the support of the outside rein. It needs to be active low in front of the withers, opposing the horse's outside shoulder and directing it into the turn. The inside rein will be used more to maintain the flexion of the horse through the turn. This is absolutely not neck reining! The pressure is not against the neck, it is back toward the horse's inside hip. It is a rein of opposition.
If you determine that your horse needs outside rein support, and assuming you will want to ride one-handed around a turn, then try using a 'sweet spot' in the rein, and apply pressure on both reins back along your inside jeans pocket and toward the horse's inside hip. That will allow your inside shoulder to move back, opening up an inside diagonal for the horse's energy to flow into the turn. Or ride two-handed. Use an active outside rein, coupled with a look with your whole body, as if your eyes were in your shoulders, to open up the inside diagonal. Teach your young horses to follow the 'look', to flex around your inside leg, and support it with two-handed reining.
Hindquarters for Turns
It is relatively easy to get the front legs of a horse on the proper track around a barrel or a pole. The hard part is getting the hindquarters to follow. Many times the rider is unaware of the fact that the hindquarters are not following at all, but instead they are fanning out and disengaging, or making a larger circle than the front end of the horse. You want the hindquarters to be in, on the inside of a turn, not fanning out (we're talking turns now, not bending). When they are in, on the ideal track around the barrel or pole, they are in a position to drive the horse forward with energy. For this reason, avoid using a bat on the inside of a turn, but rather always on the outside.
You need to be able to place any part of the horse exactly where you want it, and that includes the hindquarters. That is why we include exercises like the following in our training program:
- turn on the forehand
- head out
- shoulders in
- quarters in
- traverse
- lateral march
- counter flex
These exercises teach the horse and rider body, leg, and rein control.
Do you have a problem with losing the hindquarters in the turns? Or does your horse drift out and then dive in at the pole or the barrel? It is common to see a horse enter a turn with his hindquarters drifting wider than the front end. Try this: Ride the horse directly and straight at the pole or the barrel. Hold the hindquarters with the outside leg, well back, six inches or more behind the cinch. Instead of riding your horse to the pocket, ask the horse to shape out into a pocket at the pole or the barrel with your inside leg firmly at the cinch. He should pick up a curve in his body (flexion) for the turn as you ask. Continue to use your legs and reins to support that shape, strongly forward into and through the turn. You may find it helpful at first to place a cone or a plastic bucket (no handle) about eight or ten feet in front and just slightly to the side, so as to encourage the horse to travel inside it and straight to the pole or the barrel. You won't move him out until you are past the cone. Adjust as required. Ideally he will move his feet out sufficiently to accomplish the required lean for the turn, but his head, body, and hindquarters will remain inside, on a nice tight track around.
A Straight Horse and Shoulder Control
A straight horse is a goal, since all horses are somewhat crooked. They are right-handed or left-handed, just as we are. 'Straight' means the horse carries his body segments (head, neck, shoulders, barrel, hips) in line with his direction of travel. If traveling on a straight line, he should be straight. If traveling on a circle, he should be shaped (in an arc) to match the circumference of the circle.
Most horses will arc to the right easily, but when asked to arc to the left, they will be somewhat stiff. You see this in the pole horse that passes a pole on his right with an arc in his body to the right, but then moves on to pass the next pole on his left with that same arc in his body to the right! He seems to turn right and fall back left. Straightness is an important characteristic for barrels, but it is essential for pole bending. There is only one lead change in the barrel pattern, but there are ten (10) lead changes in the pole pattern!
There is a reason for using the terms 'straight' and 'crooked'. It goes directly to the root of the problem. The unevenness in the horse's behavior and performance on his two sides is a symptom of crookedness in his body. If we address the crookedness, we address the performance. If we approach it the other way around and attempt to treat the symptom, we may never get to the root of the problem. The fix is not as simple as exercising a horse twice as long on his weak side, although generally speaking this is a good practice. We need to encourage the horse to push strongly and evenly in impulsion with both hind legs, and we need to stretch the muscles on the side of the horse that prevent him from flexing away from that tightness.
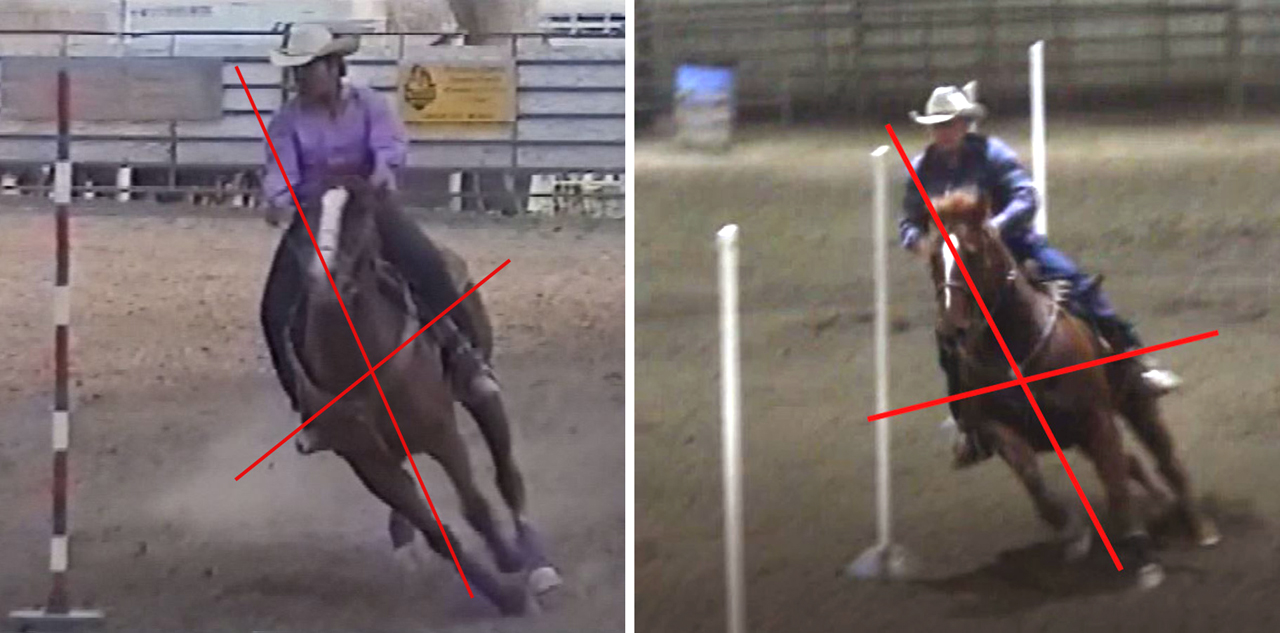
Here is how the concept of straightness relates to the horse's shoulders: In the photos above,
both the horse on the left and my horse Tommy on the right are leaning. Horses have to lean to turn.
But look at the shoulders! In relation to the body, one is down and one is up.
When the rider on the left passes that pole, her horse will feel as if it is falling down and in toward the pole.
When Tommy passes the pole, he feels like he is running standing up. To support and encourage that upright position,
I am using my inside rein and inside leg to ask Tommy to keep his shoulder up and out away from the pole.
I am holding out with the inside rein. I am not pushing with the outside rein.
I am allowing him to look where he is going with his head. The inside rein is the active rein, but the outside rein is also there but only to balance his head.
Rein the shoulders, balance the head!
The best success is achieved by addressing this challenge right from the beginning, when starting the colt, but any horse at any age can benefit from exercises to straighten him. Lateral work, like head-out, shoulder-in, counter-flex, will help greatly to straighten a horse and at the same time will benefit the rider in developing proper use of hands, legs and balance.
The Video Camera as a Training Aid
Use video. Watching videos of your own riding will reveal so much, and you and your horse will benefit for the rest of your lives.
A cell phone or tablet will work, but a video camera with zoom capability is even better. If videoing with a cell phone, ALWAYS turn it on its side so the image is wide, rather than tall.
The video camera will reveal the subtle and not so subtle errors: the flip of the horse's head when the rider bumps him in the mouth, the shoulder dropping into the pole or barrel, the short stride, the missed lead, the rider late and behind.
There are optimal locations for the camera, depending on what we want to study. I like to see runs viewed from the side and from an end. The side view will show the horse's strides and turns, and the end view will show the rider's reining and the horse's flexion, and whether the horse is staying on the ideal track.
Generally, the most helpful side position is near the middle of the six poles. Adjust the camera zoom so that you can see a little more than two poles in the frame. That will capture all of the horse and rider, and give you the needed perspective as they go through the pattern.
There is not a great deal of difference between one side and the other, unless you are looking for something specific. For example, to best see how the horse and rider complete their turns, I prefer to be on the side where the horse will turn the end poles toward me as I'm videoing. To best see how the horse and rider approach and enter their turns, I prefer to be on the side where the horse will turn the end poles away from me as I'm videoing.
I also like to see runs from one end or the other. From that position, I like to be slightly to the side so that all 6 poles can be seen in the run. That would be about 5 feet or so off the pole line. You need to use the zoom when positioned at either end so that the horse and rider remain in the frame, neither too far away nor so close that you can't see what is happening.
Also, getting up in the air always helps. If you can video down on the pattern, You have a better view of what is going on.
Video the horse entering the arena, and continue until the time is announced.
View your video in slow motion. You will be surprised at how many things go unnoticed when viewed only at normal speed.
You can find more advice on effective videoing here >>Ken -
I read your pole and barrel help on your web site again today. I believe future riders will be blessed to be able to read this.
It should make a big plus in their Pole Bending and Barrel Racing lives. Your explanations are so direct and logical that I was impressed all over again.
I am proud of your work and I am pleased that you are teaching this wonderful method to anyone who has the inclination and will take the time to absorb it.
Wayne Sandberg, June 19, 2004 (Author of the book, Nineteen Second Pole Bending)
We have a great deal of information on Pole Bending, speed event horsemanship, and horse training:
We conduct a number of Pole Bending Clinics throughout the year all across the country.
We have a Pole Bending Techniques Video, Flash Drive or DVD format, that demonstrates the technique and exercises we teach at our clinics. Included are examples of correct technique and also examples of problems and problem resolutions. Several high speed pole bending runs are also included.
We offer Pole Bending Video Lessons. We can review your videos of your pole bending runs, and return a report to you with photos from your video frames showing problem areas and recommendations for how to resolve these issues.
We have written a review of several models of Pole Bending Bases.
We receive numerous questions about the Equipment we use, and we have written an article explaining why we like to use each item.
We have written a brief explanation of the importance of the Snaffle Bit. The snaffle bit is a precision tool for establishing high levels of horse handling.
You can find all this information in the Horsemanship and Pole Bending section.
Ken Smith
Sunrise West Quarter Horses, LLC
2240 4th Avenue
Clarkston, Washington 99403
509-780-9614
All content in this document copyright © Sunrise West Quarter Horses, LLC, all rights reserved.